Create a movie reviews app with Node.js and Express
Part 3 - Create a table and add data to the database
Build web apps with NodeJS & Express
🕑 This lesson will take about 30 minutes
In this lesson, we will create a database table and add some data to the table. A table consists of columns (eg. title, director, genre, release_year, etc) and rows containing data in the columns for each record (eg. “Star Wars - A New Hope”, “George Lucas”, “Sci-Fi”, 1977, etc). Each record needs to have a unique ID to distinguish it from other records (eg. if you had a database containing records about people, you would need a unique ID to distinguish different records of people with the same name). Unique IDs can automatically be created for you when a new record is added to a database.
There are a range of data types you can use for columns in an SQLite database. These include:
INTEGER - The value is a whole number
REAL - The value is a floating point value (a number with a decimal point)
TEXT - The value is a text string, stored using the database encoding (UTF-8, UTF-16BE or UTF-16LE).
BLOB - The value is a blob of data, stored exactly as it was input.
The columns can also have extra information specified about them. For example, the movie_ID will be an INTEGER but will also be a PRIMARY KEY and set to AUTOINCREMENT.
PRIMARY KEY - a primary key is a unique identifier for each record (row) in a database table. It ensures that no two rows in the table have the same value for the primary key, effectively preventing duplicate entries. In this scenario, each movie will have a unique movie_id - it will be a number that will only be used once.
AUTOINCREMENT - this is a feature that automatically generates a unique, sequential number for a column when new rows are added to a table. This is commonly used for primary keys, ensuring each row has a unique identifier.
NOT NULL - this is a constraint that requires a column to always contain a value, preventing the insertion of NULL (or empty) values. In this example project, we will ensure that information is provided for each column (title, director, genre, etc) for each movie and that no fields are left blank.
Step 1 - Create a database table
We will use the following code to create a table to store information about movies in the database. Each new movie that is added to the database will be a 'record' or ‘row’ in the movies table.
The code will look like this and will be added before our app.get() block:
// Create a new table to store movie data
db.run(`CREATE TABLE IF NOT EXISTS movies (
movie_id INTEGER PRIMARY KEY AUTOINCREMENT,
title TEXT NOT NULL,
director TEXT NOT NULL,
genre TEXT NOT NULL,
release_year INTEGER NOT NULL,
rating INTEGER NOT NULL,
review TEXT NOT NULL,
thumbnail_image TEXT NOT NULL
);`, (err) => {
if (err) {
return console.error(err.message);
}
else{
console.log("Table created successfully");
}
});
At this point, you can run the server using the command node index.js to check that the table has been created successfully. In the terminal, you should see the message “Table created successfully”. Once this code has been executed, it can be removed or commented out as the table now exists in the database. However, if you execute the code again, the table will not be duplicated as it will only be created if it doesn’t already exist.
Step 2 - Add your first record to the database
Now that we have created a database table, we are ready to start adding some movie records to the database. To test this out, add the following code beneath the code you just added to the index.js file (you can change the movie information if you like):
// Add record to database
db.run(`INSERT INTO movies(title, director, genre, release_year, rating, review, thumbnail_image) VALUES(?, ?, ?, ?, ?, ?, ?)`, ['Star Wars - A New Hope', 'George Lucas', 'Sci-Fi', 1977, 5, 'Great movie!', 'star_wars1.png'], function(err) {
if (err) {
return console.log(err.message);
}
else{
// get the last insert id
console.log(`A row has been inserted with rowid ${this.lastID}`);
}
});
In the code above, it is important that the number of ? characters in the VALUES() block matches the number of columns in your table that you are entering data into. In this case, we are adding seven values to a new record in the table, so there should be seven question marks. Here is the complete code for the index.js file so far. Note: Once you have successfully executed the code, you can remove the block of code for adding a record to the database (as everytime you run the code, it will create another copy of that record in the database).
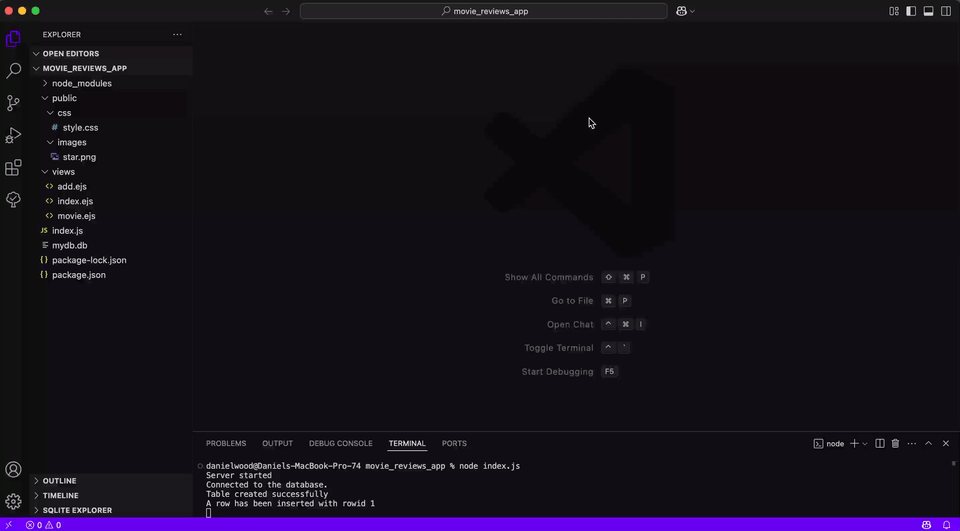
Now run the server (use the command node index.js in your terminal, or click Run if using replit.com). If all goes well, you should see the following messages displayed in the terminal confirming that the server has started, the app is connected to the database, and data has been successfully added to the database:
Server started
Connected to the database.
Table created successfully
A row has been inserted with rowid 1
If you receive an error message instead, check your code to ensure the code has been written correctly and that the data being added to the table is formatted properly. Also, check that the number of question marks in the VALUES() section of the code matches the number of values provided for each column.
Tip: Install the SQLite extension in VS Code
The SQLite extension for Visual Studio Code provides a helpful tool, called the SQLite Explorer, that allows you to view all the data in your database tables within Visual Studio Code. In VS Code, click on the Extensions icon and search for SQLite. Install the extension.

Once you have installed the SQLite extension, go back to your code. At the top of the VS Code window, click on the command palette and then click ‘Show and Run Commands’. Then select SQLite: Open Database. Then select mydb.db (or the name of your database). In the bottom left corner of the screen, you should notice the ‘SQLITE EXPLORER’ panel appear. Click this, then select your database (eg. mydb.db), select the table you wish to view, and then click the > icon next to the table name to view the existing records in the table.
You can use the SQLite extension’s tool (SQLITE EXPLORER) to check what data is currently in the database, as shown below.
Step 3 - Retrieve all movies from the database
Now that we know that we can successfully add data to the database, we can remove the test block of code that was used to manually add a movie to the database. We will use this code again later and modify it so that we can collect information about movies from users through a form and then add the movie information to the database. Now we can test out retrieving records from the database using code. The following code can be added to retrieve all movies from the database and display some basic details about them (eg. their ID, title, director, and genre).
Add the following block of code just before the app.get() block. When we run the server, this block of code will select all movies from the database, and in this example, display the results in the terminal. Note: SELECT * means “select all”. In this query, we specify the table we want to fetch records from. We can add more criteria to queries, which we will look at later.
// Query data
db.all('SELECT * FROM movies', [], (err, rows) => {
if (err) {
console.error(err.message);
}
else{
rows.forEach(row => {
console.log(row.movie_id, row.title, row.director, row.genre);
});
}
});
Start the server again, and you should see the data retrieved from the database displayed in the terminal.

Step 4 - Retrieve specific data from the database
You can modify the SELECT query by specifying search criteria. For example, you may wish to retrieve only movies released in a particular year, or from a particular director, or a particular genre. In the example below, we are modifying the SELECT query to search for all movies that match the genre “Sci-Fi” (note: you might want to add some more movies to your database first to see the effect of this)
// Query data
db.all('SELECT * FROM movies WHERE genre = ?', ['Sci-Fi'], (err, rows) => {
if (err) {
console.error(err.message);
}
else{
rows.forEach(row => {
console.log(row.movie_id, row.title, row.director, row.genre);
});
}
});
Start the server again, and you should retrieve only Sci-Fi movies from the database.
You can also add more criteria like this (eg. now we are searching for Animation movies released in 1995:
// Query data
db.all('SELECT * FROM movies WHERE genre = ? AND release_year = ?', ['Animation', '1995'], (err, rows) => {
if (err) {
console.error(err.message);
}
else{
rows.forEach(row => {
console.log(row.movie_id, row.title, row.director, row.genre);
});
}
});
Here is the full sample code:
We are now ready to start building the app so that users can view and add movies. In the next lesson, we will create the home screen for the app that will display a list of movies from the database.
Next lesson: Create a Movie Reviews app (Part 4 - Create the home page)